
When developing films in C41 or E6 process at home you normally use a special lightproof tank with a spool containing your film inside. You pour your chemicals in and out while trying to keep the temperature at correct level.
The temperature control is done by immersing your development tank (often called Paterson tank) in water of correct temperature.
Here you will see how to build a simple DIY temperature controlled film development container. It will make your home developing much more consistent and hassle free. Please watch the video below and read the post as together they contain the most complete information.
There are commercial devices for so called “rotary development” that go even one step further and also automate agitation process. I am not sure if they are still available brand new (like it or not analog photography is a dying art), but the used ones I saw for sale tend to be rather expensive.
There is no doubt that you can successfully develop C-41 film or even E-6 simply using your kitchen sink. You just fill your sink with warm water, control the temperature using a thermometer and add hot water when the temperature drops. Nothing wrong with this.
If you want to go this route I suggest you ask someone to keep an eye on water temperature for you, at least when you develop for the first time. You will be busy watching the times, pouring different baths in and out, agitating. There is a lot to do and you do not want to ruin your photos by making some silly mistake – just because you had too much to do at the same time.
Both C41 and E6 processes are temperature and time sensitive so keeping the temperature right is crucial from the quality standpoint.
Generally in C41 process wrong temperature can give you under/overdeveloped (equalling to under/overexposed) film.
In E6 there is more to mess up as you can not only get too dark/too light slides but also color shifts – and there is no fixing in post if you want to use your slides with a projector.
Eliminating the need to watch the temperature will free you up to do other elements of the process more accurately and will give you an overall more enjoyable experience. If you ever have a problematic roll and need to figure out what went wrong – then you have one thing less to take into account.
Even if you are a sworn lomographer you can still benefit from a good and carefree temperature control as it will make your developing techniques repeatable.
My DIY setup is really simple and very cheap. Everything you need can be bought off Ebay and your local household goods stores.
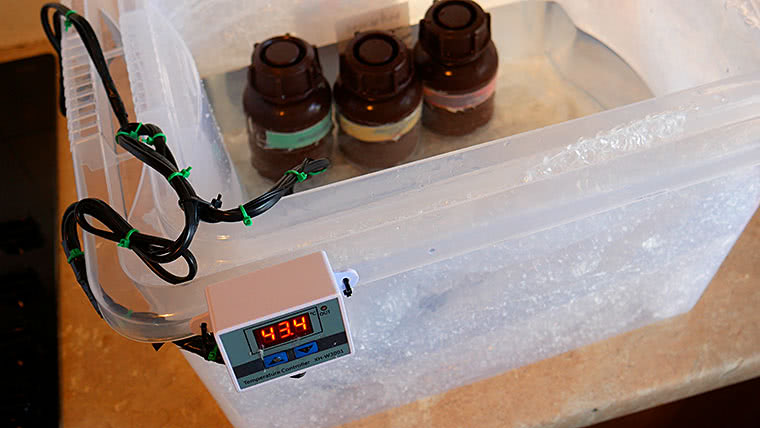
I use two transparent plastic storage containers (bought off a pound store type of shop) that fit into one another. I filled the space between them with bubblewrap. Bubblewrap serves as thermal insulation and thus decreases temperature fluctuation. Another words the water in the container cools down at a slower rate.
Also – my heater (only 80 Watts) is slightly too weak for the container size – insulation helps the heater to keep the temperature at the correct level.
I have one larger an one smaller container, but I suspect that if you have two containers of the same size the air gap between their walls can be sufficient as insulation.
Originally my idea was to use mounting foam as an insulator and bubblewrap was just a makeshift solution. It turned out to be working perfectly well though so I never bothered with the foam.
I also have another setup where I use a single storage container wrapped up in bubblewrap held in place by duct tape – works perfectly as well. If you have a strong heater I am sure you can do without any kind of insulation at all. Or if it is really warm where you develop.
You will need cheap thermostat from ebay – just look for “xh-w3001” on Ebay. Thermostat measures the water temperature with a small probe and switches the heater on and off as required to keep the temperature at set level.
The thermostat has just 4 wires + one wire that is the temperature probe. Wiring instructions are usually attached, if not just search the internet, these devices are extremely popular and have loads of uses.
You need the 220v (or whatever the mains voltage is where you live) version that powers itself from the mains. I have seen versions with separate 24v wires to power the device itself – these are no good.
If in any doubt play it safe and get an electrician to do the wiring properly for you, we are talking mains power here, it can be dangerous.
“Programming” of the device is super easy, some guy did a video so no point for me to repeat this. Just watch below.
I set my temperature to “on” at 37.8 and “off” at 38.2. As you can see in the video you do not set a single temperature but one for on and one for off state.
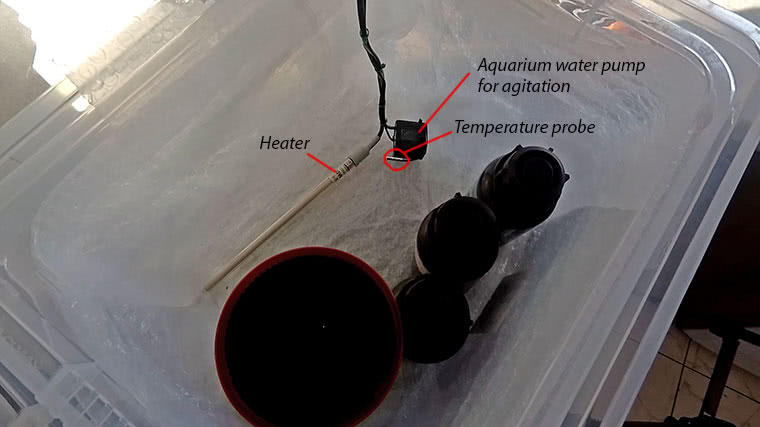
The heater itself may be the most difficult element to obtain. I use an aquarium heater.
The problem is that aquarium heaters can only go up to about 30 degrees Celsius. This is because nowadays nearly all of them have a thermostat built in and it goes only as far as it is practicable for fishkeeping. You need 38 degrees for film developing.
You may have read your Tetenal kit’s instructions and see that they mention alternative lower temperature process with longer developing times. Aquarium heaters would be just enough as you develop in 30 degrees using this process. However I do not believe the aquarium heater’s thermostat give you the required temperature accuracy.
Another problem is that the time required to develop in 30 degrees (I am talking about C41 here, there is no lower temperature process for E6 at least when using Tetenal kit) is nearly double compared to 38 degrees. It may be fun the first time but after a couple of rolls the extended developing time becomes a nuisance.
Bottom line – you need to get an aquarium heater without the thermostat and these are/may be harder to get.
For the tank/container of the size similar to mine you need at least 80 watts aquarium heater. More if it is cold where you develop (alternatively you can better insulate your water container).
Mine is 80 watts and with insulation it does the job, even though I live in Ireland where it does not get too warm to put it mildly. I would get like 150 watt one if I was buying now. You can also use two heaters of smaller wattage connected in parallel if you cannot get a single one that is strong enough.
A word of warning for those of you without aquarium tech experience: aquarium heaters are designed only to work fully submerged. Do not turn the heater on while not fully submerged or it will overheat and blow within seconds. If even a bit of glass is not under water it may/will break. I place my heater flat on the bottom of the tank.
Also please bear in mind that the thermostat itself can sustain only up to certain wattage (power consumption).
The manufacturer says 1500 watts but it is enough to look at the wires to see that it would fry the device. This is also why I would not recommend using heating elements from old kettles, camping heaters etc – because their wattage is usually high, well over 1000W, many go even over 2000W.
Aquarium heaters have modest power consumption and are unlikely to overburden the thermostat with their 100-200 Watt of power consumption.
So – we have the heating and temperature control out of the way.
Heating alone is not enough. The water needs to be agitated too. Otherwise the heater would just heat the water around itself and the probe would not get the correct overall temperature reading.
You need to keep the water moving to ensure all the water in the tank is at the same temperature.
Please note that water agitation I am talking about here is not the same thing as agitation of chemicals when developing. Having the water agitated does not replace agitations of the chemicals – I am mentioning this for those who are just starting off with film developing and may confuse one with another.
Water agitation also helps to ensure that the heat is properly transferred to your development tank or chemical bottles.
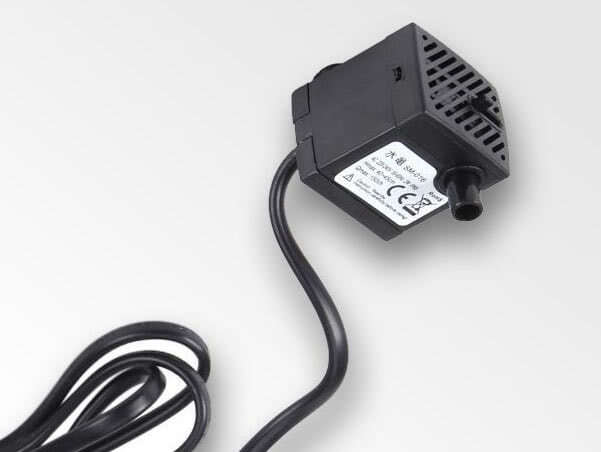
To accomplish this I use another cheap aquarium appliance – a small immersible pump that is often used to agitate the water and thus increase the level of oxygen in it. It would cost about 5 euro max, search Ebay for “Submersible Water Pump Fish Pond Aquarium”. The 150l/h 2W one would be sufficient
And this is it – a storage container, thermostat, aquarium heater, aquarium pump and you are good to go like a pro.
I think it is realistic to create a setup similar to mine for about 25 euro tops including deliveries. Cheaper if you are willing to wait for deliveries from China.
The above setup is very easy to work with and also doubles as storage container for my chemicals, Paterson tank and other bits and pieces used for film development. This way I have everything in in one place.
I usually fill the tank with water that is a couple of degrees warmer than development temperature. Then I put in my chemicals bottles. This helps my chemistry to reach the desired temperature faster.
The plastic containers usually come with some sort of cover. Putting the cover on while heating up chemicals can help the temperature to stabilise quicker.
Once the temperature drops by itself to 38 degrees the thermostat kicks in and keeps it there. I check the chemicals’ temperature with an external thermometer and if it is ok I am ready to roll.
One more tip – I keep my Paterson tank in the water the whole time (bar when I pour the baths in and out of course) and agitate by turning the agitation stick. I know a lot of oldschool people on the net put the lid on the tank and turn the whole tank. To me it is too much mess and it allows the temperature to drop as you constantly take the tank out of the water.
Agitation serves one purpose – to replenish the chemical that is in contact with film surface. It does not matter if you move the whole tank or just the spool with the film, the chemicals get moved either way.
I think the whole tank turning comes from the days when older lightproof tank types had no convenient mechanism of agitation like today’s Patersons do.
You may also see guys tapping the tank edge against the table to get rid of air bubbles that may sit on the film surface. Initial agitation with the stick takes care of this problem too.
This leads to the final small tip – get a tank with agitation stick, they are cheap. The mess that may come from agitating the old way is not worth saving a few euro/dollars.
I wish you lots of fun with analogue photography and I hope I was of help to you.